You can copy selected entities and arrange them in a three-dimensional rectangular or polar (circular) pattern. For a rectangular array, you control the number of copies in the array by specifying the number of rows and columns and the number of levels. You also specify the distance between each. For a polar array, you specify the axis around which to array the entities, the number of copies of the entities to create, and the angle subtended by the resulting array.
To create a three-dimensional rectangular array
1 Do one of the following to choose 3D Array:
• On the ribbon, choose Edit > 3D Array (in Modify).
• On the menu, choose Modify > 3D Array.
• On the Modify toolbar, click the 3D Array tool.
• Type 3Darray and then press Enter.
2 Select the entities, and then press Enter.
3 In the prompt box, choose Rectangular.
4 Type the number of rows in the array.
5 Type the number of columns.
6 Type the number of levels.
7 Specify the vertical distance between the rows.
8 Specify the horizontal distance between the columns.
9 Specify the depth between the levels.
|
|
|
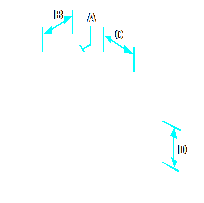
To create a three-dimensional rectangular array, select the entity to copy (A), type the number of rows, columns, and levels, and then specify the distance between each row (B), column (C), and level (D).
|
To create a three-dimensional polar array
1 Do one of the following to choose 3D Array ( ):
):
• On the ribbon, choose Edit > 3D Array (in Modify).
• On the menu, choose Modify > 3D Array.
• On the Modify toolbar, click the 3D Array tool.
• Type 3Darray and then press Enter.
2 Select the entities, and then press Enter.
3 In the prompt box, choose Polar.
4 Type the number of copies to make, including the original selection set.
5 Specify the angle the array is to fill, from 0 to 360 degrees.
The default setting for the angle is 360 degrees. Positive values create the array in a counterclockwise direction; negative values create the array in a clockwise direction.
6 In the prompt box, choose one of the following:
• Yes-Rotate Entities to rotate entities as they are arrayed.
• No-Do Not Rotate to retain the original orientation of each copy as it is arrayed.
7 Specify the center point of the array.
8 Specify a second point along the central axis of the array.
|
|
|
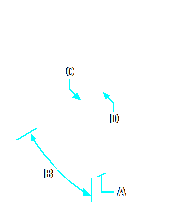
To create a three-dimensional polar array, select the entity to copy (A), type the number of copies to make, specify the angle the array is to fill (B), and then specify the center point of the array (C) and a second point along the central axis of the array (D).
|
