You can move entities around within the current drawing or from one drawing to another. The default method is to create a selection set and then specify a starting point, or base point, and an endpoint, or displacement point, to define the relocation of the entities. You can also relocate the entities using a direction vector.
To move a selection set
1 Do one of the following to choose Move ( ):
):
• On the ribbon, choose Edit > Move (in Modify).
• On the menu, choose Modify > Move.
• On the Modify toolbar, click the Move tool.
• Type move and then press Enter.
2 Select the entities, and then press Enter.
3 Specify the base point.
4 Specify the displacement point.
|
|
|
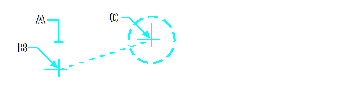
To move an entity, select it (A), and then specify the base point (B) and the displacement point (C).
|
|
Result.
|
Use shortcuts.
Press Ctrl + arrow keys to move selected entities.
Click and drag the left mouse button to move selected entities. If you often move entities accidentally using the mouse, you can turn off this feature by unmarking Use Click-Drag to Move Selected Entities on the Display tab of the Drawing Settings dialog box.
Use additional commands to move entities.
You can move, copy, rotate, and scale selected entities using a single command. Choose the Move/Copy/Rotate command or type mocoro.
You can move entities interactively using a three-dimensional visual aid, which also works for two-dimensional entities. Choose the 3D Positioner command or type 3dpositioner.
You can also move entities using grips. To move an entity using grips, select the entity to display its grips, and then click a grip and drag it. The grip you select depends on the type of entity you’re modifying. For example, to move a line entity, select the midpoint grip. To move a curved entity, such as an arc, circle, or ellipse, select the center point grip. Not all entities can be moved using grips.
To move an entity using grips
1 Select the entity.
2 Click a grip to select it.
3 Drag the entity to where you want to relocate it.
4 Click to release.
