BackToCAD Technologies LLC | Artificial Intelligence and Software Developing | Clearwater, USA; Stuttgart, Germany | Kazmierczak® Company
Customizing the ribbon
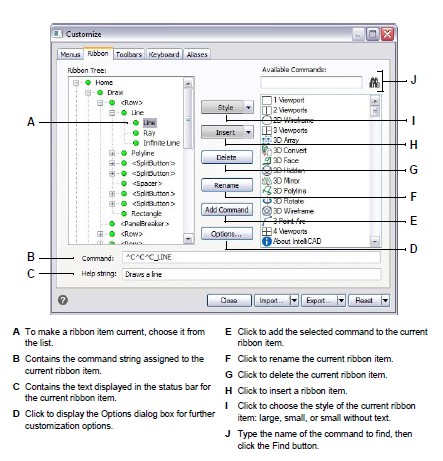
The Customize dialog box displays with a Ribbon tab for versions of CADdirect 2022 that include a ribbon in the main drawing area. You can customize the ribbon and save your changes as a .cui file. You can also load .cui files.
The CUI format is the newest user interface format and also supports all legacy user interface elements such as menus, toolbars, tablet, etc. The CUI format is the only menu format the supports the ribbon interface, so if you are creating a menu file that will support the ribbon, use the CUI format.
Creating a new ribbon tab and child panels
You can create a new ribbon tab by inserting a tab at the top level of the Ribbon Tree. Then you can add panels, or groups, to the new ribbon tab and add commands. You can also modify existing names and commands by adding, deleting, and rearranging them.
Bullet colors indicate whether a command is available at the current experience level.
A green bullet in front of a ribbon item or command indicates that the item is avail-able; a red bullet indicates that the item is not available for you to use at the experience level you have set. To change your experience level, choose Tools > Options.
To create a new ribbon tab
Do one of the following to choose Customize:
- On the ribbon, choose Tools > Customize (in Manage).
- On the menu, choose Tools > Customize.
- Type customize and then press Enter.
Click the Ribbon tab.
In the Ribbon Tree, select the ribbon tab name above which you want to add a new menu.
Choose Insert > Insert Tab.
Type a name for the new tab, and then press Enter.
Click Close.
Note that a blank tab will not appear. To see the new ribbon tab, you must perform the following steps for adding a panel and command to the ribbon.
To add a panel and command to a ribbon tab
Do one of the following to choose Customize:
- On the ribbon, choose Tools > Customize (in Manage).
- On the menu, choose Tools > Customize.
- Type customize and then press Enter.
Click the Ribbon tab.
In the Ribbon Tree, select the ribbon tab to which you want to add the new panel and command.
Choose Insert > Insert Panel.
Type a name for the new panel, and then press Enter.
Select the panel.
Choose Insert > Insert Child Row.
Select the row item.
Choose Insert > Insert Child Command button.
Enter a name for the new command, and then press Enter.
Assign a command string to the command you added by doing one of the following:
- In the Available Commands list, choose the command, and then click Add Command.
- In the Command box, type the command string, and then click Add Command.
In the Help String box, type the text to be displayed in the status bar when the cursor is positioned over the new command.
To add another command, repeat the steps above.
When you have finished, click Close.
Add three ^C (Ctrl+C) characters before a command to cancel any active commands.
When a command is selected from a ribbon, these characters will cancel any active commands or dialogs.
To rename a ribbon item
Do one of the following to choose Customize:
- On the ribbon, choose Tools > Customize (in Manage).
- On the menu, choose Tools > Customize.
- Type customize and then press Enter.
Click the Ribbon tab.
In the Ribbon Tree, select the ribbon item you want to rename.
Click Rename.
Type a new name for the ribbon item by typing over the highlighted name, and then press Enter.
Click Close.
To delete a ribbon item
Do one of the following to choose Customize:
- On the ribbon, choose Tools > Customize (in Manage).
- On the menu, choose Tools > Customize.
- Type customize and then press Enter.
Click the Ribbon tab.
In the Ribbon Tree, select the ribbon item you want to delete.
Click Delete.
In the Confirmation dialog box, click Yes to delete the ribbon item.
Click Close.
Some ribbon items have sub-items below them.
Deleting a ribbon item that has sub-items below it in the Ribbon Tree also deletes all of those sub-items.
Setting the experience levels for commands on the ribbon
You can set the experience levels for commands on the ribbon.
To set the experience levels for a command
Do one of the following to choose Customize:
- On the ribbon, choose Tools > Customize (in Manage).
- On the menu, choose Tools > Customize.
- Type customize and then press Enter.
Click the Ribbon tab.
Select all the experience levels above the lowest level you want to use.
Commands appear in the menu only at the experience levels you specify. If you select Intermediate without also selecting Advanced, the commands will appear only when you set the experience level to Intermediate.
Saving the ribbon to a file
CADdirect 2022 automatically saves any changes you make to the current ribbon. You can also create and save custom ribbons as files. Ribbon files are saved in CUI format.
Saving a ribbon does not save any menus or toolbars that you created or modified.
For details about editing a .cui file manually after saving it, see “Customizing the main window using a .cui file” on page 642 in this chapter.
To save the ribbon to a file
Do one of the following to choose Customize:
- On the ribbon, choose Tools > Customize (in Manage).
- On the menu, choose Tools > Customize.
- Type customize and then press Enter.
Click the Ribbon tab.
Click Export.
In the Export Ribbon dialog box, specify the directory and file name you want to use to save the menu file.
Click Save.
Click Close.
Loading ribbon files
You can replace the current ribbon with another custom ribbon by loading a customization (*.cui) file. For details about editing a .cui file manually before loading it, see “Customizing the main window using a .cui file” on page 642 in this chapter.
To load a ribbon file
Do one of the following to choose Customize:
- On the ribbon, choose Tools > Customize (in Manage).
- On the menu, choose Tools > Customize.
- Type customize and then press Enter.
Click the Ribbon tab.
Click Import.
Select the ribbon file (.cui file) to load.
Click Open.
Click Close.
Loading a new ribbon replaces only the ribbon. It does not replace any custom menus or toolbars you may have defined. To import a ribbon, menus, and toolbars, click Import All in the Customize dialog box.
© Copyright 2021 BackToCAD Technolgies LLC . All rights reserved. Kazmierczak® is a registered trademark of Kazmierczak Software GmbH. CADdirect 2022 is a trademark of Expert Robotics Inc. Print2CAD and CAD2Print are Trademarks of BackToCAD Technologies LLC. DWG is the name of Autodesk’s proprietary file format and technology used in AutoCAD® software and related products. Autodesk, the Autodesk logo, AutoCAD, DWG are registered trademarks or trademarks of Autodesk, Inc., and/or its subsidiaries and/or affiliates in the USA and/or other countries. All other brand names, product names, or trademarks belong to their respective holders. This website is independent of Autodesk, Inc., and is not authorized by, endorsed by, sponsored by, affiliated with, or otherwise approved by Autodesk, Inc. The material and software have been placed on this Internet site under the authority of the copyright owner for the sole purpose of viewing of the materials by users of this site. Users, press, or journalists are not authorized to reproduce any of the materials in any form or by any means, electronic or mechanical, including data storage and retrieval systems, recording, printing or photocopying.