BackToCAD Technologies LLC | Artificial Intelligence and Software Developing | Clearwater, USA; Stuttgart, Germany | Kazmierczak® Company
Customizing toolbars
CADdirect 2022 provides toolbars so that you can access frequently used commands. When a toolbar is turned on, it is always available, or on top, and in the same location so it is easy to find and use. However, toolbars occupy drawing display space and reduce the area available for working in drawings.
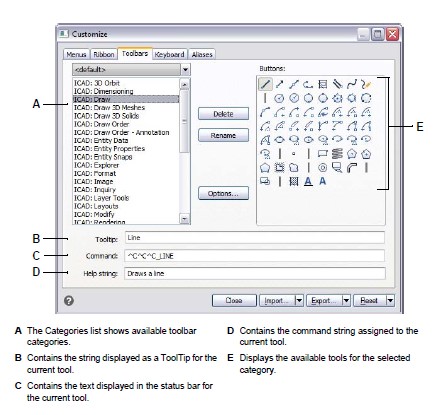
You can customize these toolbars by adding or removing tools or by rearranging the organization of tools. You can also create custom toolbars. You customize toolbars using the Customize dialog box and clicking the Toolbars tab.
Creating a new toolbar
You can create a new toolbar by dragging a tool from the Customize dialog box and dropping it anywhere except on another toolbar. CADdirect 2022 immediately creates a new toolbar and assigns it a default name. Then you can add tools to the new toolbar. You can also add, delete, or modify tools on any existing toolbar.
When you create a toolbar using tools from the Buttons area of the Customize dialog box, the ToolTip, Help String, and Command fields are filled in automatically with default information. You can edit this information for each tool.
To create a new toolbar
Do one of the following to choose Customize:
- On the ribbon, choose Tools > Customize (in Manage).
- On the menu, choose Tools > Customize.
- Type customize and then press Enter.
Click the Toolbars tab.
In the Categories list, choose a category to display its associated tools.
Click and drag a tool outside the Customize dialog box and onto an open area of the screen.
Modify the ToolTip, Help String, and Command fields as needed.
Click Close.
Add three ^C (Ctrl+C) characters before a command to cancel any active commands.
When a command is selected from a toolbar, these characters will cancel any active commands or dialogs.
To add a tool to a toolbar
Make sure the toolbar you want to modify is visible.
Do one of the following to choose Customize:
- On the ribbon, choose Tools > Customize (in Manage).
- On the menu, choose Tools > Customize.
- Type customize and then press Enter.
Click the Toolbars tab.
In the Categories list, choose a category to display its associated tools.
Click and drag a tool onto the toolbar.
Modify the ToolTip, Help String, and Command fields as needed.
To add another tool, repeat steps 4 through 6.
Click Close.
To delete a tool from a toolbar
Make sure the toolbar you want to modify is visible.
Do one of the following to choose Customize:
- On the ribbon, choose Tools > Customize (in Manage).
- On the menu, choose Tools > Customize.
- Type customize and then press Enter.
Click the Toolbars tab.
Drag the tool you want to delete off of the toolbar.
Click Close.
To add space between tools on a toolbar
Make sure the toolbar you want to modify is visible.
Do one of the following to choose Customize:
- On the ribbon, choose Tools > Customize (in Manage).
- On the menu, choose Tools > Customize.
- Type customize and then press Enter.
Click the Toolbars tab.
On the toolbar, drag the tool away from the tool beside it. To avoid accidentally deleting a tool, do not drag a tool more than halfway past the edge of the toolbar.
Click Close.
Naming toolbars
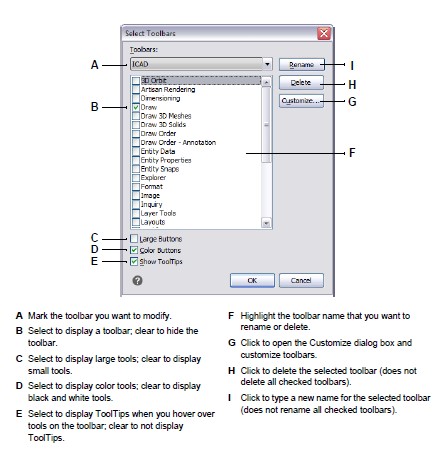
When you create a toolbar, the program assigns it an arbitrary name, such as ToolBar1, ToolBar2, and so on. When you hover over a floating toolbar, its name appears. You can rename a toolbar at any time.
In the Select Toolbars dialog box, you can rename toolbars, turn the display of tool-bars on and off, choose to display large or small tools, choose to display toolbar tools in color or black and white, and control the display of ToolTips.
To rename a toolbar
Do one of the following:
- On the ribbon, choose View > Toolbars (in Display).
- On the menu, choose View > Toolbars.
- Right-click anywhere on a toolbar (docked, undocked, or the toolbar area at the top of the window) to display the toolbar shortcut menu, and then choose Toolbars. You can also select the toolbars you want displayed directly on the shortcut menu.
- Type tbconfig and then press Enter.
From the Toolbars list, choose the toolbar that you want to rename.
Click Rename.
Type a new name for the toolbar.
Click OK.
Creating flyouts
A flyout displays a set of additional tools under a single toolbar tool. CADdirect 2022 uses flyouts to organize related tools and to conserve space on toolbars. A flyout is indicated by a small triangle in the lower right corner of a tool. When you click a flyout tool, the other tools on the flyout extend from the original tool so you can select one of them. The flyout tool you select then becomes the default tool on the toolbar. You can add your own flyouts to toolbars.
To add a flyout to a toolbar
Do one of the following to choose Customize:
- On the ribbon, choose Tools > Customize (in Manage).
- On the menu, choose Tools > Customize.
- Type customize and then press Enter.
Click the Toolbars tab.
In the list, choose a toolbar name to display its associated tools in the Buttons area.
From the Buttons area, click and drag a tool outside the Customize dialog box and drop it onto an existing tool where you want to create a flyout. If the existing tool-bar is horizontal, drop the new tool on the bottom of the existing tool. If the existing toolbar is vertical, drop the new tool on the right side of the existing tool.
Modify the ToolTip, Help String, and Command fields as needed.
To add another flyout tool, repeat steps 4 through 6.
Click Close.
Setting the experience levels for tools
You can set the experience levels for toolbar tools you create, and you can change the experience levels for existing tools.
To set the experience levels for a tool
Do one of the following to choose Customize:
- On the ribbon, choose Tools > Customize (in Manage).
- On the menu, choose Tools > Customize.
- Type customize and then press Enter.
Click the Toolbars tab.
Go outside the Customize dialog box to a toolbar, and click a tool to select it.
Go back to the Customize dialog box, and click Options.
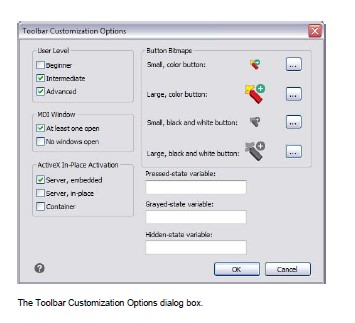
Under User Level, select the experience levels you want for that tool.
Click OK.
Click Close.
Select all the experience levels above the lowest level you want to use.
Tools appear in toolbars only at the experience levels you specify. If you select Intermediate without also selecting Advanced, the tool will appear only when you set the experience level to Intermediate.
Creating custom toolbar tools
CADdirect 2022 provides tools for most of the available CADdirect 2022 commands. These tools appear on the Toolbars tab of the Customize dialog box. You can also create your own custom tools and incorporate them into your custom toolbars. To add a custom tool to a toolbar, you must first add one of the program’s standard tools and then replace it on the toolbar with your custom tool.
You create custom tools as bitmap (*.bmp) files using any paint or illustration pro-gram capable of saving to a bitmap. Because you can configure toolbars to display either large or small tools and to display tools either in color or monochrome, create four different bitmaps for each custom tool. Create custom tools using the following dimensions:
- Small bitmaps: 16 x 16 pixels.
- Large bitmaps: 32 x 32 pixels.
For best results, bitmaps should be 32-bit ARGB format with an alpha transparent background.
Bitmaps that do not match these dimensions are stretched or reduced by the program to fit the specified size. The resulting tools may not appear as originally intended.
To customize a tool on a toolbar
Make sure the toolbar you want to modify is visible.
Do one of the following to choose Customize:
- On the ribbon, choose Tools > Customize (in Manage).
- On the menu, choose Tools > Customize.
- Type customize and then press Enter.
Click the Toolbars tab.
Go outside the Customize dialog box to a toolbar, and click a tool in the toolbar to select it.
Go back to the Customize dialog box, and click Options.
In the Toolbar Customization Options dialog box, under Button Bitmaps, click the browse tool (indicated by an ellipsis) adjacent to the Small, Color Button list to display the Select Bitmap dialog box.
Note that black and white icons are used for high contrast which is used by color blind users or others with visual impairments. See Section 508 compliance.
Select the bitmap you want to use for the small color tool.
Click Open.
Repeat steps 5 through 7 for the Large Color Button, Small Black and White But-ton, and Large Black and White Button versions of your custom tool.
When you have finished, click OK.
Click Close.
Importing toolbars
Toolbars are saved as integral parts of CADdirect 2022. In CADdirect 2022, you can load tool-bars created as part of menu files (*.mnu, *.mns). Importing a menu file from the Toolbars tab of the Customize dialog box loads only the toolbar section of the menu file, not the current pulldown menus.
To import a menu file
Do one of the following to choose Customize:
- On the ribbon, choose Tools > Customize (in Manage).
- On the menu, choose Tools > Customize.
- Type customize and then press Enter.
Click the Toolbars tab.
Click Import.
Select the menu file that contains the toolbar settings you want to load.
Click Open.
Click Close.
Importing a menu file may replace custom toolbars. Importing a menu file from the Toolbars tab of the Customize dialog box replaces any custom toolbars you may have defined. Importing the menu file in this way, however, does not affect the current pulldown menus.
Creating toolbars that you can share as files
With CADdirect 2022, the easiest way to share toolbars is to export them to a file and share that file with other CADdirect 2022 users. You can also manually create toolbars that you can share.
Toolbars can also be customized manually using .cui files. For more details, see “Customizing the main window using a .cui file” on page 642 in this chapter.
To save the current toolbars to a file
Do one of the following to choose Customize:
- On the ribbon, choose Tools > Customize (in Manage).
- On the menu, choose Tools > Customize.
- Type customize and then press Enter.
Click the Toolbars tab.
Click Export.
In the Select Toolbar dialog box, select the toolbars you want to export.
In the Select Toolbar File dialog box, specify the directory and file name you want to use to save the menu file.
In the Files Of Type list, select the desired format.
Click Save.
Click Close.
To manually create a toolbar that you can share
Open any ASCII or Unicode text editor.
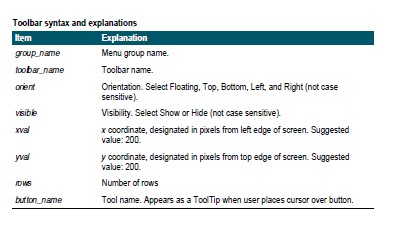
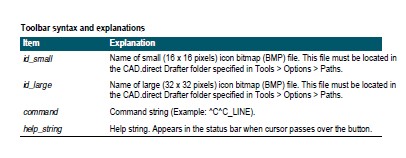
Use the following toolbar syntax to type the toolbar definitions:
***MENUGROUP=group_name
***TOOLBARS **toolbar_name
ID_toolbar_name [_Toolbar (“toolbar_name”, orient, visible, xval, yval, rows)]
ID_button_name [_Button (“button_name”, id_small, id_large)]command
***HELPSTRINGS ID_button_name [help_string]
Save the file to the CADdirect 2022 folder with a
*.mnu extension. Example Toolbar File Contents ***MENUGROUP=example
***TOOLBARS **NewDraw
ID_ NewDraw [_Toolbar(“NewDraw “, _Bottom, _Show, 200, 200, 1)] ID_Line_0 [_Button(“Line”, Iline.bmp, IL_line.bmp)]^C^C_line ID_Hatch [_Button(“Hatch”, Ihatch.bmp, IL_hatch.bmp)]^C^C_hatch ID_Dtext [_Button(“Dtext”, Idtext.bmp, IL_dtext.bmp)]^C^C_dtext ID__0 [_Button(“Circle Rad”, Icirad.bmp, IL_cirad.bmp)]^C^Ccircle; ID_Erase [_Button(“Erase”, Ierase.bmp, IL_erase.bmp)]^C^Cerase;
***HELPSTRINGS
ID_Line_0 [Creates straight line segments]
ID_Hatch [Fills an enclosed area with a non associative hatch pattern] ID_Dtext [Displays text on screen as it is entered]
ID__0 [Allows user to draw a circle with a radius value] ID_Erase [Removes objects from a drawing]
To copy an existing toolbar
Make sure the toolbar you want to copy is visible.
Do one of the following to choose Customize:
- On the ribbon, choose Tools > Customize (in Manage).
- On the menu, choose Tools > Customize.
- Type customize and press Enter.
Click the Toolbars tab.
Go outside the Customize dialog box and select a tool on the existing toolbar that you want to copy.
Copy the information from the ToolTip, Help String, and Command boxes and paste it into the corresponding lines in the text file.
Save the file to the CADdirect 2022 folder with a *.mnu extension.
To open the toolbar file on another computer
Copy the toolbar (MNU) file and all related custom bitmap (*.bmp) files to the CADdirect 2022 folder on the other computer.
Open CADdirect 2022.
Do one of the following to choose Customize:
- On the ribbon, choose Tools > Customize (in Manage).
- On the menu, choose Tools > Customize.
- Type customize and press Enter.
Click the Toolbars tab.
Click Import.
Select the new toolbar file.
Select the Append To Current Menu check box, and then click Open.
If you don’t select this box, the custom shortcut menu deletes all current menus.
Click Close.
To restore the toolbar defaults
Do one of the following to choose Customize:
- On the ribbon, choose Tools > Customize (in Manage).
- On the menu, choose Tools > Customize.
- Type customize and press Enter.
Click Reset.
© Copyright 2021 BackToCAD Technolgies LLC . All rights reserved. Kazmierczak® is a registered trademark of Kazmierczak Software GmbH. CADdirect 2022 is a trademark of Expert Robotics Inc. Print2CAD and CAD2Print are Trademarks of BackToCAD Technologies LLC. DWG is the name of Autodesk’s proprietary file format and technology used in AutoCAD® software and related products. Autodesk, the Autodesk logo, AutoCAD, DWG are registered trademarks or trademarks of Autodesk, Inc., and/or its subsidiaries and/or affiliates in the USA and/or other countries. All other brand names, product names, or trademarks belong to their respective holders. This website is independent of Autodesk, Inc., and is not authorized by, endorsed by, sponsored by, affiliated with, or otherwise approved by Autodesk, Inc. The material and software have been placed on this Internet site under the authority of the copyright owner for the sole purpose of viewing of the materials by users of this site. Users, press, or journalists are not authorized to reproduce any of the materials in any form or by any means, electronic or mechanical, including data storage and retrieval systems, recording, printing or photocopying.