BackToCAD Technologies LLC | Artificial Intelligence and Software Developing | Clearwater, USA; Stuttgart, Germany | Kazmierczak® Company
Editing in three dimensions
You can copy, move, rotate, array, mirror, and align two-dimensional and three-dimensional entities in both two-dimensional and three-dimensional space. You can also change and edit properties of three-dimensional entities much like you change and edit properties for two-dimensional entities. When you modify three-dimensional entities in two-dimensional space, you modify the entity in relation to the current UCS.
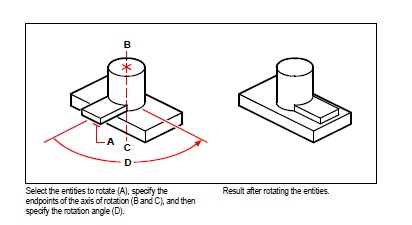
Rotating in three dimensions
You can rotate selected entities about a specified axis in three-dimensional space. You select the entities to rotate and then define the axis of rotation either by specifying two points; selecting an existing entity; aligning the axis with the x-, y-, or z-axis of the current UCS; or aligning the axis with the current view.
To rotate an entity about an axis in three dimensions
Do one of the following to choose 3D Rotate:
- On the ribbon, choose Edit > 3D Rotate (in Modify).
- On the menu, choose Modify > 3D Operations > 3D Rotate.
- On the Modify toolbar, click the 3D Rotate tool.
- Type rotate3D and then press Enter.
Select the entities to rotate, and then press Enter.
Choose from one of the following options: Entity, Last, View, Xaxis, Yaxis, Zaxis.
Specify the rotation angle.
Specify the reference angle.
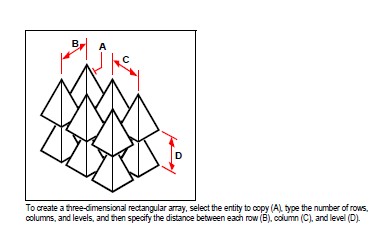
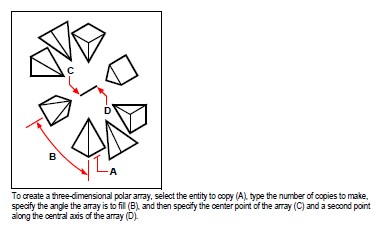
Arraying in three dimensions
You can copy selected entities and arrange them in a three-dimensional rectangular or polar (circular) pattern. For a rectangular array, you control the number of copies in the array by specifying the number of rows and columns and the number of levels. You also specify the distance between each. For a polar array, you specify the axis around which to array the entities, the number of copies of the entities to create, and the angle subtended by the resulting array.
To create a three-dimensional rectangular array
Do one of the following to choose 3D Array:
- On the ribbon, choose Edit > 3D Array (in Modify).
- On the menu, choose Modify > 3D Operations > 3D Array.
- On the Modify toolbar, click the 3D Array tool.
- Type 3Darray and then press Enter.
Select the entities, and then press Enter.
In the prompt box, choose Rectangular.
Type the number of rows in the array.
Type the number of columns.
Type the number of levels.
Specify the vertical distance between the rows.
Specify the horizontal distance between the columns.
Specify the depth between the levels.
To create a three-dimensional polar array
Do one of the following to choose 3D Array:
- On the ribbon, choose Edit > 3D Array (in Modify).
- On the menu, choose Modify > 3D Operations > 3D Array.
- On the Modify toolbar, click the 3D Array tool.
- Type 3Darray and then press Enter.
Select the entities, and then press Enter.
In the prompt box, choose Polar.
Type the number of copies to make, including the original selection set.
Specify the angle the array is to fill, from 0 to 360 degrees.
- The default setting for the angle is 360 degrees.
- Positive values create the array in a counterclockwise direction.
- Negative values create the array in a clockwise direction.
In the prompt box, choose one of the following:
- Yes-Rotate Entities to rotate entities as they are arrayed.
- No-Do Not Rotate to retain the original orientation of each copy as it is arrayed.
Specify the center point of the array.
Specify a second point along the central axis of the array.
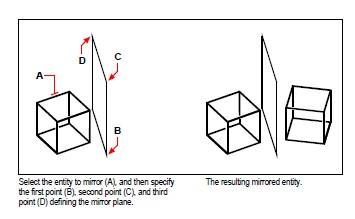
Mirroring in three dimensions
You can create a mirror image of selected entities in three-dimensional space. You mirror the entities about a mirror plane that you define by either specifying three points; selecting an existing two-dimensional planar entity; aligning the plane parallel with the xy, yz, or xz plane of the current UCS; or aligning the plane with the current view. You can delete or retain the original entities.
To mirror an entity about a three-dimensional plane
Do one of the following to choose 3D Mirror:
- On the ribbon, choose Edit > 3D Mirror (in Modify).
- On the menu, choose Modify > 3D Operations > 3D Mirror.
- On the Modify toolbar, click the 3D Mirror tool.
- Type mirror3D and then press Enter.
Select the entities, and then press Enter.
In the prompt box, choose 3 Points, or press Enter to select the default.
Specify the first point on the mirror plane.
Specify the second and third points on the plane.
In the prompt box, choose one of the following:
- Yes-Delete Entities to delete the original entities.
- No-Keep Entities to retain the original entities.
Aligning in three dimensions
You can align one or more selected entities with other entities in three-dimensional space. First you select the entities you want to move and align, then you specify pairs of points to move and align the selected entities:
- One pair of points — Moves selected entities.
- Two pairs of points — Moves then rotates selected entities. The second pair of points can also determine the scale of moved entities (scaling is available only when using two pairs of points).
- Three pairs of points — Moves, rotates, then again rotates selected entities.
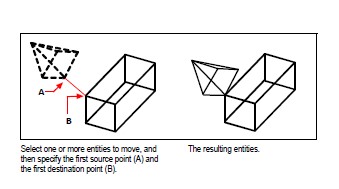
To align entities by moving them
Do one of the following to choose Align:
- On the ribbon, choose Edit > Align (in Modify).
- On the menu, choose Modify > Align.
- On the Modify toolbar, click the Align tool.
- Type align and then press Enter.
Select the entities that will be moved, and then press Enter.
Do not include destination entities in the selection set.
Specify the first source point.
Specify the first destination point, then press Enter.
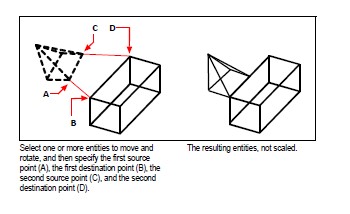
To align entities by moving and rotating them
Do one of the following to choose Align:
- On the ribbon, choose Edit > Align (in Modify).
- On the menu, choose Modify > Align.
- On the Modify toolbar, click the Align tool.
- Type align and then press Enter.
Select the entities that will be moved and rotated, and then press Enter.
Do not include destination entities in the selection set.
Specify the first source point then the first destination point.
Specify the second source point then the second destination point, then press Enter.
If desired, choose Yes to scale the moved entities. Otherwise, choose No.
If scaling, the selected entities scale proportionately so that the distance between the two source points is the same as the distance between the two destination points.
The scaling option is available only when selecting two pairs of points.
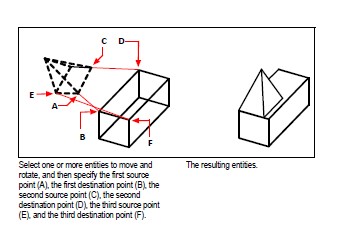
To align entities by moving and then rotating them twice
Do one of the following to choose Align:
- On the ribbon, choose Edit > Align (in Modify).
- On the menu, choose Modify > Align.
- On the Modify toolbar, click the Align tool.
- Type align and then press Enter.
Select the entities that will be moved and rotated, and then press Enter.
Do not include destination entities in the selection set.
Specify the first source point then the first destination point.
Specify the second source point then the second destination point.
Specify the third source point then the third destination point, then press Enter.
© Copyright 2021 BackToCAD Technolgies LLC . All rights reserved. Kazmierczak® is a registered trademark of Kazmierczak Software GmbH. CADdirect 2022 is a trademark of Expert Robotics Inc. Print2CAD and CAD2Print are Trademarks of BackToCAD Technologies LLC. DWG is the name of Autodesk’s proprietary file format and technology used in AutoCAD® software and related products. Autodesk, the Autodesk logo, AutoCAD, DWG are registered trademarks or trademarks of Autodesk, Inc., and/or its subsidiaries and/or affiliates in the USA and/or other countries. All other brand names, product names, or trademarks belong to their respective holders. This website is independent of Autodesk, Inc., and is not authorized by, endorsed by, sponsored by, affiliated with, or otherwise approved by Autodesk, Inc. The material and software have been placed on this Internet site under the authority of the copyright owner for the sole purpose of viewing of the materials by users of this site. Users, press, or journalists are not authorized to reproduce any of the materials in any form or by any means, electronic or mechanical, including data storage and retrieval systems, recording, printing or photocopying.