BackToCAD Technologies LLC | Artificial Intelligence and Software Developing | Clearwater, USA; Stuttgart, Germany | Kazmierczak® Company
Selecting entities
You can create a selection set that consists of one or more entities for modification.
Use any of the following methods to create a selection set:
- Choose a command or tool first, and then select entities.
- Select entities first, and then choose a command or tool (most entities).
- Select entities by pointing, and then use grips to modify them.
Understanding when to select entities
You can select entities before or after you choose a command.
Selecting entities first
When you select entities and then issue a command, the program immediately acts on the entities you’ve selected. In many cases, a command-specific prompt box provides additional options for that editing operation. If you want to modify the selection set at that point, right-click to display the prompt box with the selection options and choose the option you want. To redisplay the command-specific prompt box, right-click again.
After you select one or more entities, you can choose an entity-modification command, such as the Copy or Move command. You can also click the right mouse button to display a shortcut menu containing the entity-modification commands appropriate for the selected entities, and then choose the command from the menu.
Choosing a command first
When you choose an entity-modification tool or command first, the program prompts
you to select entities and displays a prompt box from which you can choose a selection method. You can select individual entities or use other techniques such as selection windows to select multiple entities.
When you select entities, you add them to the selection set. After you select at least one entity, you can remove entities from the selection set. To finish adding entities to the selection set, press Enter. Most entity-modification commands then act on the entire selection set.
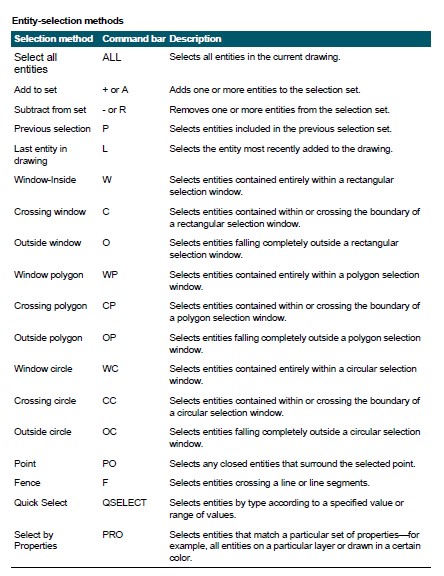
Understanding entity-selection methods
When you choose a command that requires you to select entities (when you’re deleting or changing entity properties, for example), you can use any of the following selection methods by choosing them in the prompt box or entering them in the command bar.
You can also use a few selection methods automatically, without displaying the prompt box:
- Click one or more entities to select them.
- Click an entity to select it, then Ctrl + click to cycle through the entities below the cursor, selecting one at a time.
- Click two opposite corners of a rectangular selection window. The direction in which you define the points of the rectangle (left-to-right or right-to-left) deter-mines which type of window you create.
Selecting entities by clicking them
You can click entities to select them.
To select entities by clicking them
Click an entity.
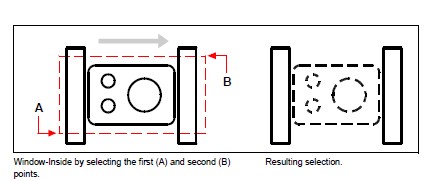
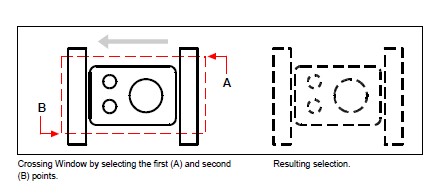
Selecting entities by drawing a selection window
You can draw a selection window to include the entities contained within the window.
To create a selection window from left to right
- Click to select a point in the drawing.
- Click to the right of the first point to select a second point in the drawing.
To create a selection window from right to left
- Click to select a point in the drawing.
- Click to the left of the first point to select a second point in the drawing.
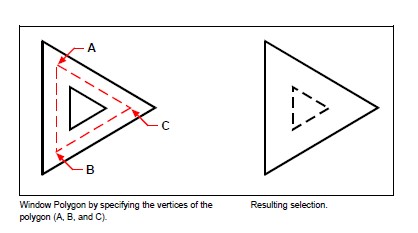
In addition to a rectangular window, you can define a selection window using other shapes such as a polygon or circle.
To select entities using a polygon selection window
- Activate an entity-modification command.
- In the prompt box, choose Window Polygon.
- Specify the vertices of the polygon.
- To complete the selection polygon, press Enter.
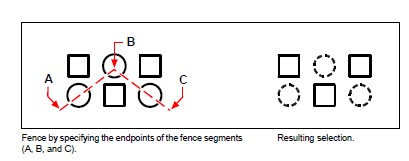
Selecting entities using a fence
A selection fence is a multisegmented line that selects entities it crosses.
To select entities using a fence
- Activate an entity-modification command.
- In the prompt box, choose Fence.
- Specify the endpoints of the Fence segments.
- To complete the Fence, press Enter.
Filtering entity selection
Filtering a selection is an efficient way to select a set of entities that have something in common. For example, you can select all entities with the same property such as color, all entities that are proxies, or all entities with the same value, block name, or type. You can even add or remove more filters to a set of entities to further customize the selection.
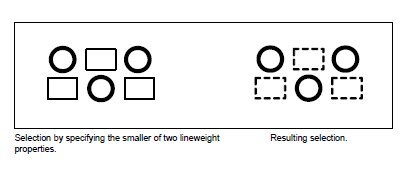
Selecting entities by property
CADdirect makes it easy to select entities according to their common properties, allowing you to modify large sets of entities quickly and efficiently. When selecting entities, simply use a filter to add or remove entities according to these common properties: color, layer, linetype scale, linetype, lineweight, thickness, and width.
Use the List command to get more information for filtering.
If you are unsure what properties are available for filtering, type list to select an area of the drawing and list the selected entities and their properties.
To select entities by property using a properties filter
Activate an entity-modification command, or type select.
Choose Filter.
Choose a filter option:
- Color — Enter the color of entities you want to select.
- Layer — Enter the layer name of entities you want to select.
- LinetypeScale — Enter the linetype scale of entities you want to select.
- Linetype — Enter the linetype of entities you want to select.
- Lineweight — Enter the lineweight of entities you want to select.
- Thickness — Enter the thickness of entities you want to select. Note that some entities have thickness, however, lines, circles, arcs, and polylines all have thickness.
- Width — Enter the width of entities you want to select. Note that only polylines have width.
Names of properties are case sensitive.
For example, a drawing with layers SAMPLE Layer 1, SAMPLE Layer 2, and SAMPLE Layer 3 will return no selection if you specify “SAMPLE” for the layer name. Specifying “SAMPLE*” returns two layers, “*Layer*” returns all layers, and “sample*” returns one layer.
If desired, add or remove more entities using a filter:
- Choose any other filter option to add more entities to the selection set.
- Choose Remove to remove entities from the selection set according to the filter you choose next.
- A prompt displays the total number of entities in the selection set.
To complete the selection, press Enter.
Selecting proxy entities using a filter
Proxy entities are entities or custom objects that CADdirect 2022 does not support. When a drawing containing proxy entities is loaded into CADdirect 2022, a message displays indicating that some entities will not display, however, the entities reappear when you open the drawing later in a CAD application that supports those entities.
Proxy entities can be selected using typical selection methods, but they can also be selected using a filter, for example, you might want to select all proxies and place them on a hidden layer or delete them if you know they won’t be needed in the future.
To select proxy entities using a filter
Activate an entity-modification command, or type select.
Choose Filter.
Choose Proxy.
If desired, add or remove more entities using a filter:
- Choose any other filter option to add more entities to the selection set.
- Choose Remove to remove entities from the selection set according to the filter you choose next.
- To complete the selection, press Enter.
Selecting blocks of the same name
Some drawings contain many of the same blocks, which are easy to select as a set using a filter.
Use the List command to get block names.
If you are unsure what blocks are available for filtering, type list to select an area of the drawing and list the selected entities and their block names.
To select entities by block name
Activate an entity-modification command, or type select.
Choose Filter.
Choose Block.
Enter the block name of the entities you want to select.
If desired, add or remove more entities using a filter:
- Choose any other filter option to add more entities to the selection set.
- Choose Remove to remove entities from the selection set according to the filter you choose next.
- A prompt displays the total number of entities in the selection set.
- To complete the selection, press Enter.
Selecting entities by type
You can filter entities in a selection set according to their type, for example, a circle, line, text, attribute, or block type.
Use the List command to get type names.
If you are unsure what entity types are available for filtering, type list to select an area of the drawing and list the selected entities and their types.
To select entities by type using the filter option
Activate an entity-modification command, or type select.
Choose Filter.
Choose Type.
Enter the type name (a string value) of the entities you want to select.
If desired, add or remove more entities using a filter:
- Choose any other filter option to add more entities to the selection set.
- Choose Remove to remove entities from the selection set according to the filter you choose next.
- A prompt displays the total number of entities in the selection set.
- To complete the selection, press Enter.
Use the Quick Select command to select entities by type.
You can also type qselect to select entities by type.
Selecting entities by value
You can filter entities in a selection set according to common properties and their values. For example, you can filter a selection set to include all the entities that are the color red and use the Dashed2 linetype, and then change the value of the linetype.
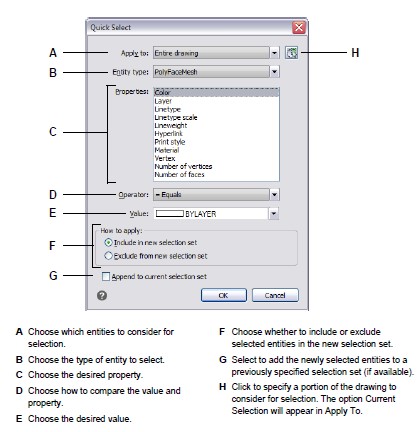
To select entities by value using Quick Select
Do one of the following to choose Quick Select:
- On the menu, choose Home > Quick Select (in Utilities).
- On the menu, choose Tools > Quick Select.
- On the Properties pane or Save Block to Disk dialog box, click the Quick Select tool.
- Type qselect.
n Apply To, specify which entities to consider for selection. For example, select Entire Drawing to consider all entities in the drawing. To specify a portion of the drawing to consider for selection, click and make your selection directly in the drawing.
In Entity Type, specify the type of entity you want to select.
Specify the property to filter for selection, its operator, and value. The options vary by entity type.
Select one of the following:
- Include in New Selection Set Creates a new selection that includes only those entities that meet the selected options.
- Exclude from New Selection Set Creates a new selection set that includes all of the entities except those that meet the selected options.
To add the newly selected entities to a current selection set (available if entities were selected before using the Quick Select command), mark Append to Current Selection Set.
Click OK.
To select entities by value using the filter option
Activate an entity-modification command, or type select.
Choose Filter.
Choose Value.
Enter the value (a string) of the entities you want to select.
If desired, add or remove more entities using a filter:
- Choose any other filter option to add more entities to the selection set.
- Choose Remove to remove entities from the selection set according to the filter you choose next.
- A prompt displays the total number of entities in the selection set.
- To complete the selection, press Enter.
Use the List command to get values.
If you are unsure what values are available for filtering, type list to select an area of the drawing and list the selected entities and their values.
Deselecting entities
If an entity is no longer needed in a selection set, you can deselect it to remove it from the selection set.
To remove an entity from the selection set
Press Shift, and then select the entity again.
Use a shortcut.
Pressing Shift while selecting entities using a crossing window removes all entities from the specified selection set.
To remove all entities from the selection set
Press Escape.
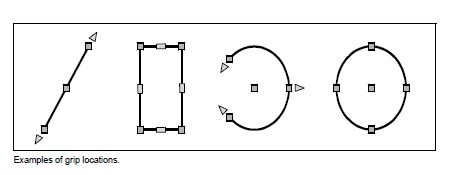
Using grips
To use grips for editing, you select an entity to display the grips, and then click a grip to make it active. The grip you select depends on the type of entity you’re modifying and the editing operation you’re performing. For example, to move a line entity, drag it by its midpoint grip. To stretch the line, drag one of the endpoint grips. You do not need to enter a command when using grips.
Selecting grips for editing
You can select entities first and then choose how to modify them. As you select each entity, it is highlighted with small squares called grips, which appear at strategic points on the entity.
The locations of the grips depend on the type of entity selected. For example, grips appear at the endpoints and midpoint of a line, at the quadrant points and center point of a circle, and at the endpoints, midpoint, and center of an arc.
To select grips for editing
Click an entity to select it and display grips.
Click a grip to make it active.
Do any of the following:
- Drag the grip to move it.
- Choose a command, such as Copy or Move.
- Press the Spacebar to cycle through available commands, such as Copy, Move, Rotate, and more, depending on the entity and the selected grip.
Turning grips on and off
You can turn the use of grips on and off and control the size and color of grips.
To change grip settings
Do one of the following to choose Drawing Settings:
- On the ribbon, choose Home > Drawing Settings (in Utilities) or choose Tools > Drawing Settings (in Manage).
- On the menu, choose Tools > Drawing Settings.
- On the Tools toolbar, click the Drawing Settings tool.
- Type ddgrips and then press Enter.
In the Drawing Settings dialog box, click the Display tab.
In the Change Settings For list, click Grips and choose from the following:
- Enable grips — Click to activate grips for all selected entities.
- Grip size — Specify the grip size.
- Grip color — Click to assign the color for grips.
Click OK.
Displaying selected entities highlighted
You can specify whether to display selected entities highlighted, which makes the selection set easier to see. By default, the highlighting feature is turned on.
To turn the highlighting feature on or off
Do one of the following to choose Drawing Settings:
- On the ribbon, choose Home > Drawing Settings (in Utilities) or choose Tools > Drawing Settings (in Manage).
- On the menu, choose Tools > Drawing Settings.
- On the Tools toolbar, click the Drawing Settings tool.
- Type settings and then press Enter.
Click the Display tab.
In the Change Settings For box, select Display.
Select or clear the Highlight Item When Selected check box.
Click OK.
© Copyright 2021 BackToCAD Technolgies LLC . All rights reserved. Kazmierczak® is a registered trademark of Kazmierczak Software GmbH. CADdirect 2022 is a trademark of Expert Robotics Inc. Print2CAD and CAD2Print are Trademarks of BackToCAD Technologies LLC. DWG is the name of Autodesk’s proprietary file format and technology used in AutoCAD® software and related products. Autodesk, the Autodesk logo, AutoCAD, DWG are registered trademarks or trademarks of Autodesk, Inc., and/or its subsidiaries and/or affiliates in the USA and/or other countries. All other brand names, product names, or trademarks belong to their respective holders. This website is independent of Autodesk, Inc., and is not authorized by, endorsed by, sponsored by, affiliated with, or otherwise approved by Autodesk, Inc. The material and software have been placed on this Internet site under the authority of the copyright owner for the sole purpose of viewing of the materials by users of this site. Users, press, or journalists are not authorized to reproduce any of the materials in any form or by any means, electronic or mechanical, including data storage and retrieval systems, recording, printing or photocopying.