BackToCAD Technologies LLC | Artificial Intelligence and Software Developing | Clearwater, USA; Stuttgart, Germany | Kazmierczak® Company
Using CADdirect 2022 data in other programs
You can use any of the following methods to include CADdirect 2022 data in a document created in another program:
- Embedding
- Linking
- Dragging
- Exporting
- E-mailing
The method you choose depends on the capabilities of the other program and how you want to work with the CADdirect 2022 data after you’ve placed it in the other document.
Each method except exporting uses ActiveX to integrate data from different programs. With ActiveX, you can open CADdirect 2022 drawings from within the other program to modify the CADdirect 2022 drawings.
Embedding drawings
When you embed an CADdirect 2022 drawing, it becomes part of the other program’s document file. When you edit the drawing, you edit only the version that is embedded in the other document.
Embedding is useful when you don’t want to maintain a link to the CADdirect 2022 drawing for the data you include in the other document. Edits made to the new drawing do not affect the original drawing. To transfer the file to other computers, you can transfer all the data in one file, but embedded objects increase the file size.
From within a document in a program that supports ActiveX, such as Microsoft® Word, you can either create a new embedded CADdirect 2022 drawing or embed an existing CADdirect 2022 drawing.
To create an CADdirect 2022 drawing in another document
In the document, choose Insert > Object (or the equivalent command for that program).
In the dialog box, click the options for creating a new file.
Under Object Type, choose CADdirect 2022 Drawing, and then click OK.
Create the CADdirect 2022 drawing.
If CADdirect 2022 is running in its own window, choose File > Exit.
If CADdirect 2022 is running within the other document (in place), click somewhere in the document outside the CADdirect 2022 drawing to close CADdirect 2022.
To edit the CADdirect 2022 drawing from within the document, double-click the drawing.
You can also embed an existing CADdirect 2022 drawing from within another document. Follow step 1 in the preceding procedure, and then click the option for creating an object from an existing file.
To embed selected CADdirect 2022 entities
In CADdirect 2022, select the entities you want to embed.
Choose Edit > Copy (or press Ctrl+C).
Open the document in which you want to embed the entities.
Choose Edit > Paste (or the equivalent command).
To embed an entire CADdirect 2022 drawing
Open the document in which you want to embed the drawing.
Do one of the following:
On the ribbon, choose Insert > Object (in Data).
On the menu, choose Insert > Object
Type insertobj and then press Enter.
3. Click Create From File.
4. Click Browse, and then choose the file you want to embed.
5. Click Insert, and then click OK.
16.4.2 Editing an embedded CADdirect 2022 object in place
In many ActiveX-compatible programs you can edit an embedded CADdirect 2022 object without leaving the program (or container application). This is called in-place editing. A different set of CADdirect 2022 menus and toolbars temporarily replaces most of the menus and controls in the active window while you edit the CADdirect 2022 object.
To edit an embedded CADdirect 2022 object in place
In the container application, double-click the embedded CADdirect 2022 object.
A different set of CADdirect 2022 menus and controls appears.
Edit the CADdirect 2022 drawing.
Click anywhere outside the drawing window to exit the in-place editing controls.
Linking drawings
When you link an CADdirect 2022 drawing to another document, the other document contains only a reference to the CADdirect 2022 drawing file, rather than the actual drawing. You link data in a saved CADdirect 2022 file so that the other program can find the data and display it.
Linking works well when you want to include the same CADdirect 2022 data in more than one document. When you update the data, you need update it in only one location. The versions that are linked to other documents reflect the changes automatically.
Linking an CADdirect 2022 file to another document does not increase the file size the way embedding an CADdirect 2022 object does. However, links require more maintenance. To transport the data, you must make sure to transfer all linked files to the other computer.
To link an CADdirect 2022 file to another document
Open the drawing you want to link.
- Because a link is a reference to a file, the referenced file must be saved on a local or remote disk.
- If you haven’t saved the drawing you want to link, choose File > Save.
In the other program, open the document in which you want to include the CADdirect 2022 drawing.
Choose that program’s command for inserting objects.
In Microsoft® Office programs, choose Insert > Object. In the Object dialog box, click the Create From File tab. Specify the name of the drawing file you want to link. Select the Link To File check box, and then click OK.
The drawing appears in the document, with a link to the original CADdirect 2022 file.
Dragging CADdirect 2022 drawings into other programs
If the other program in which you want to include CADdirect 2022 drawings is compatible with ActiveX, an alternative to pasting drawings with menu commands is to drag drawing file icons from Windows Explorer into the other document. Dragging and dropping drawings does not use the Clipboard, so data on the Clipboard is not affected.
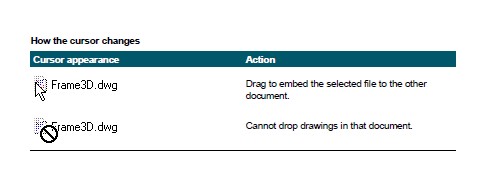
When you drag an CADdirect 2022 drawing file from Windows Explorer, you link or embed the entire drawing in the other document. When you drag the file, the cursor changes in response to the action you take.
For easy drag-and-dropping, position the application windows side by side.
Before you drag a drawing, position the Windows Explorer window and the other program’s window so you can see the file icon and the document in which you want to drop it.
To drag and embed drawings into another document
Select the icon for the drawing file, and then drag the drawing into the document.
Exporting drawings
You can save or export CADdirect 2022 drawings in a number of different formats for use with other programs. When you save a drawing in a different format, the program saves all the entities in the drawing to the new file. Or, you can choose which entities are included in the new file.
File formats that can be exported:
The following table describes the file formats that can be exported.
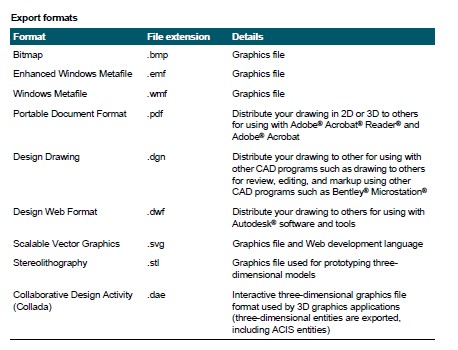
You can also export ACIS solids, regions, and surfaces to an ASCII file (*.sat) that you can use in other programs.
Exporting to a BMP, EMF, WMF, STL, DAE, or SVG format file.
Exporting to a file is similar to saving a standard file.
To export a drawing to a .bmp, .emf, .wmf, .stl, .dae, or .svg file
Do one of the following:
- On the ribbon, choose the Application button then choose Export, or choose Output > Export.
- On the menu, choose File > Export.
- Type export and then press Enter.
In the Export Drawing As File dialog box, under Save As Type, choose the file format.
Specify the name of the file you want to create.
Click Save.
If the selection prompt box displays, choose the entity-selection method, and then create the selection set.
When you have finished selecting entities, press Enter.
Exporting to a PDF format file
PDF format files allow you to distribute your drawing to others for viewing in Adobe® Acrobat® Reader®, which is free software that users can download. PDF files can also be viewed, reviewed, and edited in Adobe® Acrobat.
You can export drawings to two-dimensional and three-dimensional PDF files.
To export a drawing to a .pdf file
Do one of the following:
- On the ribbon, choose the Application button then choose Export, or choose Output > Export.
- On the menu, choose File > Export.
- Type export and then press Enter.
In Save As Type, choose Portable Document Format (pdf).
Specify the name of the file you want to create.
Click Save.
Choose the entity-selection method, and then create a selection set that contains the entities you want to export.
When you have finished selecting entities, press Enter.
To create a 3D .pdf file instead of 2D, mark Enable Layer Support and then mark 3D PDF Export.
Choose additional options for how you want to export to the .pdf file. Click [?] to see details about each option.
Click Export.
Exporting to a DWF format file
DWF format files allow you to publish your drawings so they can be viewed on the Internet using a Web browser. CADdirect 2022 exports your drawing to a Design Web Format (.dwf) file, which can be viewed in a Web browser if Autodesk Design Review is also installed on the computer. Design Review is a free tool from Autodesk.
You can export your drawing to a 2D .dwf file or a 3D .dwf file. 2D .dwf files have smaller file sizes, but cannot be viewed in three dimensions. 3D .dwf files can be viewed in three dimensions using the Autodesk® Design Review, but have larger file sizes.
To export a drawing to a .dwf file
1. Do one of the following:
On the ribbon, choose the Application button then choose Export, or choose Output > Export.
On the menu, choose File > Export.
Type export and then press Enter.
2. In Save As Type, choose Design Web Format (dwf).
3. Specify the name of the file you want to create.
4. Click Save.
5. Choose the entity-selection method, and then create a selection set that contains the entities you want to export.
6. Choose how you want to export:
DWF File Version — Choose the file version you want. Version 4.2 can export entities on the Model tab only (no layouts). Version 5.5 can export the current layout only. Version 6.0 can export the current layout or all layouts.
DWF File Format — Choose the desired file format. Compressed binary files have a smaller file size than uncompressed binary files (both are 2D .dwf files). ASCII files have the largest file size for 2D .dwf files, but 3D .dwf files have larger file sized and can be viewed in three dimensions.
Layout to Export — Choose whether to export the current layout only, or all layouts in the drawing.
7. Click OK.
8. When you have finished selecting entities, press Enter.
16.4.8 Exporting to a DGN format file
DGN format files allow you to distribute your drawing to others for review, editing, and markup using other CAD programs such as Bentley® Microstation®. Files are exported to DGN version 8 files.
To export a drawing to a .dgn file
1. Do one of the following:
On the ribbon, choose Output > DGN Out (in Export).
Type dgnexport and then press Enter.
2. Specify the name of the file you want to create.
3. Click Save.
4. At the prompt, choose a master unit for the .dgn file such as kilometers or feet.
5. At the prompt, choose a sub unit for the .dgn file such as inches or mils.
The drawing is exported.
16.4.9 Exporting to an ACIS format file
You can export ACIS entities such as surfaces, regions, and solids to an ACIS format file in ASCII (SAT) format.
To export an ACIS format file
1. Do one of the following:
On the ribbon, choose the Application button then choose Export, or choose Output > Export.
On the menu, choose File > ACIS in.
Type acisout and then press Enter.
2. Select the ACIS entities you want to save.
3. Specify the name of the file you want to create.
4. Click Save.
16.4.10 Converting drawings to other file versions and formats
Several types of drawings can be converted to other file versions and formats. You can convert a batch of drawings in a folder or specify a single drawing to convert.
The following formats can be converted from and converted to:
Autodesk DWGä format - Autodesk Drawing Format is a drawing with a .dwg file extension.
Autodesk DXFä format - Autodesk Drawing Exchange Format is an ASCII description of a drawing file with a .dxf file extension.
DGN format — Drawing files used with Bentleyâ Microstationâ. The DGN for-mat uses the .dgn file extension.
To convert a single drawing
1. Do one of the following to choose CADdirect 2022 Converter:
On the ribbon, choose the Application button then choose Drawing Utilities > CADdirect 2022 Converter, or choose Tools > CADdirect 2022 Converter (in Manage).
On the menu, choose File > CADdirect 2022 Converter.
Type intelliconvert and then press Enter.
2. Choose Single file, then click next.
3. Select an input file. Click [...] to browse to the location.
4. Name an output file. Click [...] to browse to the location.
5. In Convert to version, select the file format and version for the output file.
6. If you are converting to a .dgn file, select any of the following:
Master unit — Assigns the selected master unit to the output .dgn file.
Sub unit — Assigns the selected sub unit to the output .dgn file.
Bind external references when possible — Makes external references a permanent part of the .dgn file, similar to a block, if external references are found in the input drawing.
7. If you have more files to convert, mark Convert more files.
8. Click Finish.
A log file is created automatically if converting to a .dgn file and errors occur.
The file <output_dgnfilename>.log is saved in the same folder where the output .dgn file is created.
To convert a batch of drawings
1. Do one of the following to choose CADdirect 2022 Converter:
On the ribbon, choose the Application button then choose Drawing Utilities > CADdirect 2022 Converter, or choose Tools > CADdirect 2022
Converter (in Manage).
On the menu, choose File > CADdirect 2022 Converter.
Type intelliconvert and then press Enter.
2. Choose Multiple files, then click Next.
3. Specify the input files by doing the following:
Enter an input folder. Click [...] to browse to the location.
To include files located in subfolders within the input folder, mark Process subfolders.
Choose which files to include: .dwg, .dxf, and .dgn.
4. Click Next.
5. Review the list of files that are found, then click Next to proceed using all of the named files. You can also click Back to specify different files.
6. Enter an output folder. Click [...] to browse to the location.
7. Mark Convert, then select the output format and file version.
8. To audit and fix files during the conversion, mark Audit files and fix errors. You can also choose to save audit log files, which will also be saved in the output folder.
9. Select what to do, if while processing, files with the same name are found in the output folder:
Replace existing — Replaces existing files with the new files. To make a backup copy of the existing file before it is overwritten, mark Create backup files (*.bak), and backup files will be created in the same output folder.
Skip existing — Skips adding a new file if an existing file is found with the same name.
Add suffix to output files — Adds the specified suffix to all new files created in the output folder.
10. If you are converting to a .dgn file, select any of the following:
Master unit — Assigns the selected master unit to the output .dgn file.
Sub unit — Assigns the selected sub unit to the output .dgn file.
Bind external references when possible — Makes external references a permanent part of the .dgn file, similar to a block, if external references are found in the input drawing.
11. Click Next.
New files are generated based on your specifications.
A log file is created automatically if converting to a .dgn file and errors occur.
The file <output_dgnfilename>.log is saved in the output folder that was specified for batch file conversion.
16.4.11 Sending drawings through e-mail
You can send an CADdirect 2022 drawing CADdirect 2022 is compatible with e-mail
Messaging Application Program Inter-face (MAPI) protocol.
To include a drawing file in an e-mail message
1. While the drawing file is open, choose File > Send Mail.
If your mail program is not already running, it starts; a new e-mail message containing the CADdirect 2022 icon and file name appears.
2. Address the e-mail, type a message, and send the e-mail message as you would any other message.
To view an CADdirect 2022 file sent by e-mail
Open the e-mail message, and then double-click the CADdirect 2022 icon. CADdirect 2022 software must be installed on the computer used to open drawings from e-mail.
© Copyright 2021 BackToCAD Technolgies LLC . All rights reserved. Kazmierczak® is a registered trademark of Kazmierczak Software GmbH. CADdirect 2022 is a trademark of Expert Robotics Inc. Print2CAD and CAD2Print are Trademarks of BackToCAD Technologies LLC. DWG is the name of Autodesk’s proprietary file format and technology used in AutoCAD® software and related products. Autodesk, the Autodesk logo, AutoCAD, DWG are registered trademarks or trademarks of Autodesk, Inc., and/or its subsidiaries and/or affiliates in the USA and/or other countries. All other brand names, product names, or trademarks belong to their respective holders. This website is independent of Autodesk, Inc., and is not authorized by, endorsed by, sponsored by, affiliated with, or otherwise approved by Autodesk, Inc. The material and software have been placed on this Internet site under the authority of the copyright owner for the sole purpose of viewing of the materials by users of this site. Users, press, or journalists are not authorized to reproduce any of the materials in any form or by any means, electronic or mechanical, including data storage and retrieval systems, recording, printing or photocopying.