BackToCAD Technologies LLC | Artificial Intelligence and Software Developing | Clearwater, USA; Stuttgart, Germany | Kazmierczak® Company
Using print styles
CADdirect 2022 uses print styles to change the appearance of your printed drawing with-out modifying the actual entities in your drawing. Assigning print styles allows you to customize the color, pen width, linetype, and lineweight that are used to print your drawing.
Print styles help you control what your drawing looks like when it is printed. Rather than describe what an entity looks like on your screen, print styles describe what an entity will look like when you print it. For example, you can map all yellow entities in your drawing to print in blue without modifying the actual entities. You could also map all yellow entities to print with whatever lineweight, linetype, or pen width that you specify.
Because print styles are saved in print style tables, which are files located on your computer, disk, or server, you can reuse them to help eliminate the need to reconfigure your print settings each time you print a drawing. For example, you may have multiple clients who have their own printing preferences. You can save print styles in a named file for each of your clients. You can even share the file with co-workers, or store the files on a network to ensure that everyone in your office uses the same standards.
Understanding print style tables
A print style table is a collection of print styles that allows you to change the appearance of your printed drawing without modifying the actual entities in your drawing. Each print style table is saved in a file that can be located on your computer, disk, or server.
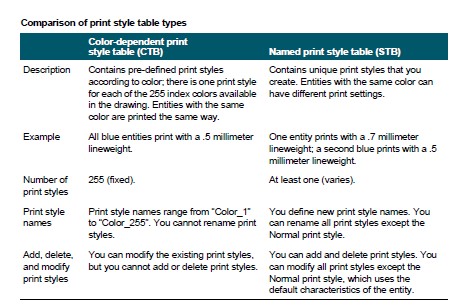
A drawing can use one type of print style table at a time. There are two types of print style tables:
- Color-dependent print style tables (CTB) contain a collection of print styles based on each of the 255 index colors available in a drawing. True colors and color books are not applicable to color-dependent print style tables.
- Named print style tables (STB) contain a collection of print styles that you define. They can vary regardless of color.
With color-dependent print style tables, you cannot assign print styles to individual entities or layers. To use these print styles, you assign a specific color to an entity or layer. When you specify a color-dependent print style table at printing time, the entity colors and layer colors map to color-based print styles in the print style table that you specify.
With named print style tables, you can assign named print styles to individual entities and layers. Entities and layers assigned print styles are printed according to the print style table that you specify at printing time. If you specify a print style for a specific entity, that print style overrides any print style assigned to the layer on which the entity resides.
Sometimes a named print style assigned to an entity or layer is not located in the print style table that is assigned to a layout or drawing. This can happen if the print style has been deleted from the named print style table or if you assign a different named print style table to the drawing that does not contain the named print style. In this case, the entity is printed using its default properties, which is similar to assigning the Normal print style to an entity or layer. If you plan on interchanging named print style tables within the same drawing, it’s a good idea to coordinate the tables to use the same print style names.
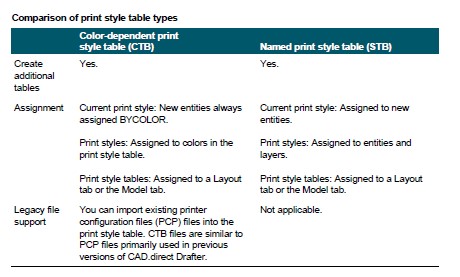
If a new drawing is based on a template, the new drawing uses the same type of print style table as the template. If a new drawing is created without a template, the type of print style table is specified in the New Drawing Wizard; by default, the new drawing uses the print style table type specified in Tools > Options on the Printing tab. Every drawing is designed to use print style tables, but you decide whether to implement them.
Implementing print style tables
Every drawing is designed to use print style tables, but you decide whether to implement them. Even if you use one of the default print style tables available with CADdirect 2022, using print style tables requires planning ahead of time to ensure that your drawing prints as planned.
For example, a single drawing of a floor plan might require the printing of the following drawing sheets:
- Main Floor Plan Walls print with thick, black lines.
- Electrical Plan Walls print with normal gray lines, indicating that they are not the focus.
- HVAC Plan Walls print with normal gray lines, indicating that they are not the focus.
- Roof Plan Walls print with thin, gray lines and a hidden linetype, indicating that they are hidden under the roof in a plan view.
In this example, you can create four named print style tables, each containing a print style named “WallPstyle”. Each print style table contains its own settings for “WallPstyle” to control how the walls print. Assign WallPstyle to either the wall entities or to a wall layer. Then, assign a different named print style table each time you print, or create four layouts and assign a different print style table to each layout.
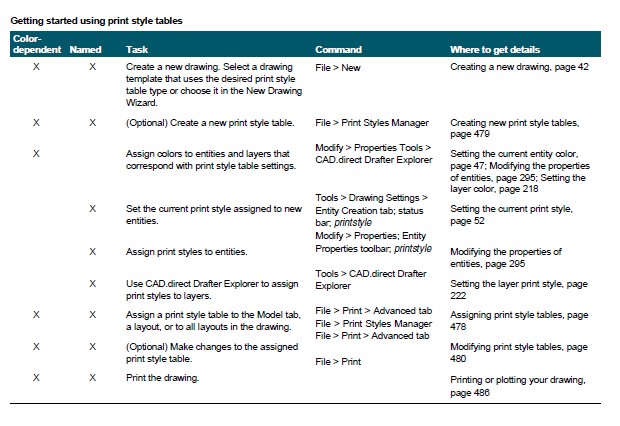
The following table describes, in order, the steps to get you started using both color-dependent and named print style tables.
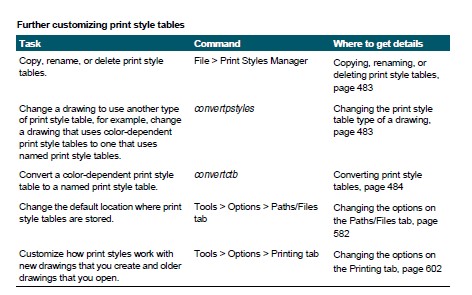
The following table describes how to further customize how print styles work within
your drawings.
Assigning print style tables
Select a print style table before printing if you want to change how your drawing appears when you print it. Print style tables can modify how colors, pen widths, line-types, and lineweights look when they are printed.
You can assign print style tables globally for all layouts (including the Model tab), or individually for the Model tab or a Layout tab. Assigning a print style table to an individual layout allows you to further customize the layouts you use to print a drawing.
However, assigning different named print style tables to various layouts may result in mismatched print style names; a named print style assigned to an entity or layer may not be located in the assigned print style table at print time. In this case, entities are printed using their default properties, which is similar to assigning the Normal print style to an entity or layer.
To assign a print style table at the same time you print
If necessary, click the desired Layout tab, or click the Model tab. 2 Do one of the following to choose Print:
- On the ribbon, choose the Application button then choose Print, or choose Output > Page Setup Manager (in Plot).
- On the menu, choose File > Print.
- Type print and then press Enter.
You can assign a print style table to a page setup.
Use the Page Setup Manager to assign a print style table to a page setup that you use for printing. For more details, see Specifying pen and line printing options.
Under Print Style Table (Pen Assignments), select a print style table that you created or one of the following:
- None — Applies no print style table. Entities print according to their own properties.
- Icad — Uses the default print style table and its color assignments.
- Monochrome — Prints all colors as black.
Select Save Changes to Layout, and then click OK.
When a drawing is first created it is assigned to use either color-dependent or named print style tables.
For details on converting a drawing to use a different type of print style table, see “Understanding print style tables” on page 474 in this chapter.
Creating new print style tables
CADdirect 2022 offers several print style tables to help you get started. If you want to customize your print output further, you can create your own print style table. You can create a new print style table entirely from scratch, based on CADdirect 2022 registry set-tings, or by importing a printer configuration file (PCP file).
To create new print style tables
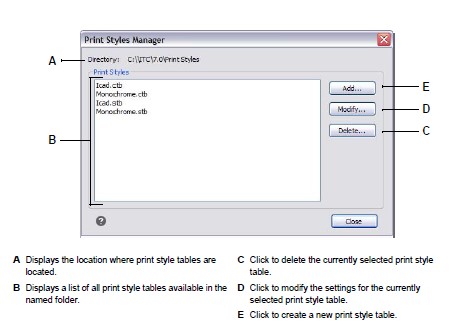
Do one of the following to choose Print Styles Manager:
- On the ribbon, choose the Application button then choose Print > Print Styles Manager, or choose Output > Print Styles Manager (in Plot).
- On the menu, choose File > Print Styles Manager or choose Format > Print Styles Manager.
- On the Format toolbar, click the Print Styles Manager tool.
- Type stylesmanager and then press Enter.
Click Add.
Complete the setup wizard.
On the last wizard page, you can click Print Style Table Editor to set up the print styles for the table. For more details about the Print Style Table Editor options, see the next section.
Modifying print style tables
When your drawing was created, it was set up to use color-dependent or named print style tables:
- Color-dependent print style tables (.ctb files) — You can modify individual print styles within the table, but you cannot add, rename, or delete print styles. Color-dependent print style tables always have 255 print styles, each named for a specific color. Your changes affect all entities and layers assigned that color.
- Named print style tables (.stb files) — You can add, modify, rename, and delete individual print styles within the table. However, you cannot modify, rename, or delete the Normal print style. Your changes affect all entities and layers that are assigned that print style name.
Use a system variable to determine the type of print style table your drawing uses.
If you can’t remember what type of print style table is assigned to your drawing, use the PSTYLEMODE system variable to determine the print style table type.
Each print style within a print style table specifies a color, pen numbers, linetype, and lineweight. CADdirect 2022 recognizes additional characteristics for compatibility with AutoCAD only, including: dither, grayscale, screening, adaptive, line end style, line join style, and fill style.
When specifying print style characteristics, be sure to consider the limitations of your output device.
It is recommended that you only modify print style tables that you have created.
If you modify a default print style table that came with CADdirect 2022, you overwrite the original information which is then lost.
To modify print style tables
Do one of the following to choose Print Styles Manager:
- On the ribbon, choose the Application button then choose Print > Print Styles Manager, or choose Output > Print Styles Manager (in Plot).
- On the menu, choose File > Print Styles Manager or choose Format > Print Styles Manager.
- On the Format toolbar, click the Print Styles Manager tool.
- Type stylesmanager and then press Enter.
Select the print style table you want to modify.
Click Modify.
Click the General tab, and then do any of the following:
- Enter a new table description.
- Select Apply Global Scale Factor to Non-ISO Linetypes to apply the scale factor to non-ISO linetypes used for any print style in the current print style table. This also applies to fill patterns, which are not used in CADdirect 2022, but are recognized for compatibility with AutoCAD.
- Enter a scale factor to apply to non-ISO linetypes used for any print style in the current print style table.
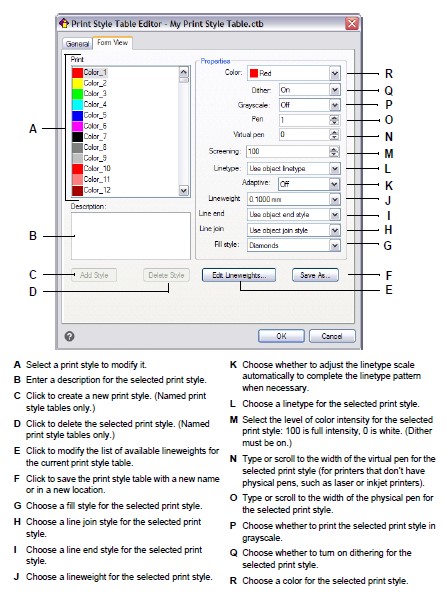
Click the Form View tab, and then do any of the following:
- Make format changes to a print style by selecting it in the Print Styles list, then make color, pen map, linetype, or lineweight changes for the print style. Your changes are saved automatically for the selected print style.
- Add a new print style by clicking Add Style. Enter a new name, and then click OK. Select the options for the print style. (Available for named print styles only.)
- Rename a print style by selecting it in the Print Styles list. Single-click the print style again, and then enter a new name. (Available for named print styles only.)
- Delete a print style by selecting it in the Print Styles list. Click Delete Style. (Available for named print styles only.)
Click OK.
Copying, renaming, or deleting print style tables
Copy, rename, or delete a print style table just as you would any other file on your computer. Regardless of which print style table type your drawing uses, you can use the Print Style Manager to manage both color-dependent and named print style tables.
To delete print style tables
Do one of the following to choose Print Styles Manager:
- On the ribbon, choose the Application button then choose Print > Print Styles Manager, or choose Output > Print Styles Manager (in Plot).
- On the menu, choose File > Print Styles Manager or choose Format > Print Styles Manager.
- On the Format toolbar, click the Print Styles Manager tool.
- Type stylesmanager and then press Enter.
Select a print style table, then click Delete.
Color-dependent print style tables are .ctb files and named print style tables are .stb files.
To copy, rename, or delete print style tables
On your computer, open the folder that stores print style tables, for example, \CompanyName\ProductVersion\Print Styles.
Copy, rename, or delete the print style table just as you would any other file on your computer.
Changing the print style table type of a drawing
When your drawing was created, it was set up to use color-dependent print style tables (.ctb files) or named print style tables (.stb files). A drawing can use one type of print style table at a time. If necessary, after a drawing is created you can convert the drawing to use the other type of print style table.
If you can’t remember what type of print style table is assigned to your drawing, use the PSTYLEMODE system variable to determine the print style table type.
To change a drawing to use named print style tables
If you want to reuse any of the existing print style information, convert your color-dependent print style tables to named print style tables. For details, see “To convert a color-dependent print style table to a named print style table” on page 485 in this chapter.
Open the drawing that uses color-dependent print style tables (.ctb files).
Type convertpstyles, and then press Enter.
If you have already converted your individual color-dependent print style tables to named tables, click OK in the prompt that displays.
If you have not converted the tables, click Cancel. First use convertctb to convert your color-dependent print style tables to named tables. If you do not, all of the print style information you specified in your drawing will be lost.
Select a named print style table (.stb file) that you want to use with the drawing.
Click Open.
Errors will occur if you have not converted print style tables.
If you have not converted a color-dependent print style table to a named print style table, you will be warned that the table you have selected does not contain color map-ping and the drawing cannot be converted.
To change a drawing to use color-dependent print style tables
Open the drawing that uses named print style tables (.stb files).
Type convertpstyles, and then press Enter.
If you are sure you want to convert the drawing and lose all print style assignments, click OK in the prompt that displays.
If you do not want to lose the print style assignments, click Cancel.
Converting a drawing to use color-dependent print style tables will remove all of the named print style information from entities and layers.
However, the named print style tables are not deleted from your computer.
Converting print style tables
You can convert a color-dependent print style table to a named print style table. You cannot convert a named print style table to a color-dependent print style table because color-dependent tables contain only print styles that are named after the 255 colors to which they map.
Converting a color-dependent print style table to a named print style table can be helpful in the following situations:
- You don’t want to create a named print style table from scratch.
- You want to create a named print style table that has the same settings as a color-dependent print style table, but with some new print styles or other custom set-tings.
- You want to convert a drawing to use named print style tables and you want to reuse most of print styles already defined in a color-dependent print style table.
To convert a color-dependent print style table to a named print style table
Type convertctb, and then press Enter.
Select the color-dependent print style table (.ctb file) that you want to convert.
Click Open.
Enter a name for the new named print style table (.stb file).
Click Save.
The print styles in the new table are named Style 1, Style 2, and so on. If want to use different print style names, rename the print styles before you assign them to entities and layers in your drawing. If you rename the print styles after assigning them, they will not match when you print your drawing. For information about renaming print styles, see “Modifying print style tables” on page 480 in this chapter.
Turning print style tables on or off
When you turn off print style tables, entities print according to their own properties. However, all of the print style information is saved so you can easily turn on print styles again. Actual print style table files are not deleted, and for drawings that use named print style tables, entities and layers retain their assigned print styles.
To turn off print style tables
Click the Layout tab or Model tab for which you want to turn on or off print style tables.
Do one of the following to choose Page Setup Manager:
- On the ribbon, choose the Application button then choose Page Setup Manager, or choose Output > Page Setup Manager (in Plot).
- On the menu, choose File > Page Setup Manager.
- On the Format toolbar, click the Page Setup Manager tool.
- Type pagesetup and then press Enter.
Select the desired page setup, then click Modify.
In Print style table, select a print style table to turn on print style tables, or select None to turn off print style tables.
Click OK.
Click OK.
© Copyright 2021 BackToCAD Technolgies LLC . All rights reserved. Kazmierczak® is a registered trademark of Kazmierczak Software GmbH. CADdirect 2022 is a trademark of Expert Robotics Inc. Print2CAD and CAD2Print are Trademarks of BackToCAD Technologies LLC. DWG is the name of Autodesk’s proprietary file format and technology used in AutoCAD® software and related products. Autodesk, the Autodesk logo, AutoCAD, DWG are registered trademarks or trademarks of Autodesk, Inc., and/or its subsidiaries and/or affiliates in the USA and/or other countries. All other brand names, product names, or trademarks belong to their respective holders. This website is independent of Autodesk, Inc., and is not authorized by, endorsed by, sponsored by, affiliated with, or otherwise approved by Autodesk, Inc. The material and software have been placed on this Internet site under the authority of the copyright owner for the sole purpose of viewing of the materials by users of this site. Users, press, or journalists are not authorized to reproduce any of the materials in any form or by any means, electronic or mechanical, including data storage and retrieval systems, recording, printing or photocopying.