BackToCAD Technologies LLC | Artificial Intelligence and Software Developing | Clearwater, USA; Stuttgart, Germany | Kazmierczak® Company
Working with images
You can modify and view raster images directly inside of CADdirect 2022. You can load, edit, and modify multiple images as overlays or underlays to your CADdirect 2022 drawings. The images can be selected for use with CADdirect 2022 commands by selecting the image frame, which can be turned on or off for printing or selection purposes.
CADdirect 2022 supports numerous image file formats, including BMP, JPG, GIF, EMF, TIF, PNG, WMF, SID, and many more.
Attaching images
When you attach an image to a drawing, the image displays in the drawing but is not saved in the drawing. The image file remains saved in its original location on your computer, network, or other media.
If you send or receive drawings that contain images, it is important to include with the drawing all of the image files attached to it. When you open a drawing that contains images, the source image files must be accessible for the images to display in the drawing.
To attach an image
Do one of the following to choose Attach Image:
- On the ribbon, choose Insert > Attach Image (in Data).
- Choose Insert > Image > Attach Raster Image.
- On the Image toolbar, click the Attach Image tool.
- Type imageattach and then press Enter.
Specify a file to attach, and then click Open.
In Image Path will be Saved As, enter a different image file location, if necessary. You can click [ > ] to choose how you want to save the image path:
- Full Path — The image is referenced using its full path, for example, c:\My Pictures\MyImage.jpg. Use this option if the image is saved in a folder unrelated to the current drawing folder.
- Relative Path — The image is referenced using a path relative to the current drawing folder, for example, ..\My Pictures\MyImage.jpg. Use this option if the image is stored in a subfolder of the current drawing folder.
- File Name Only — The image is referenced using its file name in the current drawing folder, for example, MyImage.jpg. Use this option if the image is saved in the same folder as the current drawing.
In the Attach Image dialog box, specify the position, scale, rotation, transparency, and clipping options, and then click OK.
NOTE Transparency works for images that support alpha transparency, that is, images that have at least one color that can be viewed as a transparent color.
In the drawing, specify an insertion point, scale, and rotation if you chose to specify those on the screen.

You can also attach images using the Image Manager or CADdirect 2022 Explorer:
Choose Insert > Image > Image Manager, and then click Attach to specify an image and then attach it, or if you want to quickly add another occurrence of an image already located in the drawing, select the image in the Image Manager and then click Add. Or, choose Tools > CADdirect 2022 Explorer and attach an image as an externally reference file.
Modifying images
You can modify an image by changing its brightness, contrast, fade, size, rotation, or transparency. These changes affect the image in the drawing only — not the original image file.
In addition to modifying a single image or multiple images that you select, you can also modify all occurrences of an image within a drawing. For example, if your company logo appears in multiple locations throughout a drawing, you can use the Image Manager to specify the changes once and apply them to all occurrences of the logo.
You can use other CADdirect 2022 commands for typical modifications, such as Delete, Move, Layer, and more.
To modify images
Do one of the following to choose Image Manager:
- On the ribbon, choose Insert > Image Manager (in Data).
- On the menu, choose Insert > Image > Image Manager.
- On the Image toolbar, click the Image Manager tool.
- Type image and then press Enter.
TIP You can also modify images by selecting one or more images in a drawing, and then choosing Modify > Properties.
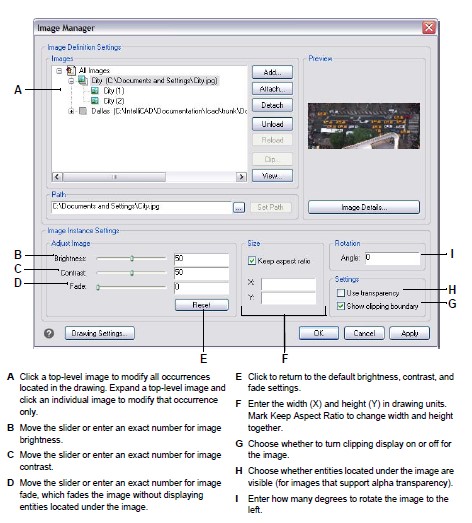
In the Images list, select the image you want to modify. If there is more than one occurrence of the image in the drawing, do one of the following:
- To modify all occurrences of the image, select a top-level image in the list.
- To modify a single occurrence of the image, expand a top-level image in the list, and then select the individual image.
Adjust the Brightness, Contrast, and Fade by moving the slider to the setting you want or by entering an exact number. The image preview shows how your changes will affect the image.
TIP If you want to restore the image to the default brightness, contrast, and fade settings, click Reset.
Adjust the Size by making changes to the width (X) and height (Y) in drawing units. Mark Keep Aspect Ratio if you want the width and height to change together to retain the aspect ratio of the image.
Adjust the Rotation by entering the number of degrees you want to rotate the image to the left. Zero degrees indicates no rotation.
Mark Use Transparency if you want entities located under the image to be visible (for images that support alpha transparency, that is, images that have at least one color that can be viewed as a transparent color).
Mark Show Clipping Boundary if you want to show the image clipped, if a clip-ping boundary is defined for the image. Unmarking this option displays the whole image, even if a clipping boundary is defined.
Click OK.
Changing the display of images
You can change the following for how all images display in a drawing:
Image quality — Images can display in high or low resolution.
Image frames — Images can display with or without frames on their edges.
Changing the display quality for all images. High quality displays images in high resolution and requires more system resources. Draft quality displays images in low resolution and consumes fewer system resources. Changing the quality setting affects all images in the drawing.
To change the display quality for all images
Do one of the following to choose Image Quality:
- On the ribbon, choose Insert > Image Quality (in Data).
- On the menu, choose Insert > Image > Image Quality.
- On the Image toolbar, click the Image Quality tool.
- Type image quality and then press Enter.
Choose High or Draft.
Turning image frames on or off for all images
When image frames are turned on, a frame displays and prints on the edge of all images in the drawing. When image frames are turned off, none of the images display or print with a frame, which also makes images unselectable. Each image frame dis-plays with the properties (layer, color, linetype, etc.) that are assigned to the image.
Turning image frames off may be helpful, for example, if the images are part of a background in the drawing.
To turn image frames on or off for all images
Do one of the following to choose Display Image Frame:
- On the ribbon, choose Insert > Display Image Frame (in Data).
- On the menu, choose Insert > Image > Display Image Frame.
- On the Image toolbar, click the Display Image Frame tool.
- Type image frame and then press Enter.
Choose On or Off.
TIP You can use IMAGEFRAMEMODE to turn image frames on or off while display and printing images.
Clipping images
You can clip images so that only a portion of the image is visible in a drawing. The visible portion (or the invisible portion for inverted clips) can be in the shape of a rectangle or polygon.
Image clipping can be turned on an off. If you turn off clipping for an image, the entire image is visible provided that the image is on a layer that is on and thawed. The clipping information is retained however, and you can turn clipping back on at any time.
If you delete clipping from an image, the clipping is removed permanently but the image itself remains in the drawing.
Clipping images in the shape of a rectangle
To clip an image in the shape of a rectangle
Make sure that image frames are turned on — so you can select images — by choosing Image > Display Image Frame, and then choose On.
Do one of the following to choose Clip Image:
- On the ribbon, choose Insert > Clip Image (in Data).
- On the menu, choose Insert > Image > Clip Image.
- On the Image toolbar, click the Clip Image tool.
- Type image clip and then press Enter.
Select the edge of the image you want to clip.
If prompted, choose New to create a new clipping boundary.
Choose Rectangle. If you want to invert the clip, that is, hide the area inside the boundary, choose Invert clip before choosing Rectangle.
Define the first corner of the clipping rectangle.
Define the opposite corner of the clipping rectangle.
Only the portion of the image located within the clipping rectangle is visible.
Clipping images in the shape of a polygon
To clip an image in the shape of a polygon
Make sure that image frames are turned on — so you can select images — by choosing Image > Display Image Frame, and then choose On.
Do one of the following to choose Clip Image:
- On the ribbon, choose Insert > Clip Image (in Data).
- On the menu, choose Insert > Image > Clip Image.
- On the Image toolbar, click the Clip Image tool.
- Type imageclip and then press Enter.
Select the edge of the image you want to clip.
If prompted, choose New to create a new clipping boundary.
Choose Polygon. If you want to invert the clip, that is, hide the area inside the boundary, choose Invert clip before choosing Polygon.
Select the points for the polygon, and then press Enter when the polygon is complete.
Only the portion of the image located within the clipping polygon is visible.
Turning clipping on or off for images
To turn clipping on or off for an image
Make sure that image frames are turned on — so you can select images — by choosing Image > Display Image Frame, and then choose On.
Do one of the following to choose Clip Image:
- On the ribbon, choose Insert > Clip Image (in Data).
- On the menu, choose Insert > Image > Clip Image.
- On the Image toolbar, click the Clip Image tool.
- Type imageclip and then press Enter.
Select the edge of the image for which you want to turn clipping on or off.
Choose On or Off.
Removing clipping from images
To remove clipping from an image
Make sure that image frames are turned on — so you can select images — by choosing Image > Display Image Frame, and then choose On.
Do one of the following to choose Clip Image:
- On the ribbon, choose Insert > Clip Image (in Data).
- On the menu, choose Insert > Image > Clip Image.
- On the Image toolbar, click the Clip Image tool.
- Type image clip and then press Enter.
Select the edge of the image for which you want to remove clipping.
Choose Delete.
Unloading and reloading images
If you find that including an image affects system performance, you can unload it so only the image frame displays to mark its location. If you want an unloaded image to print, reload it before printing. You may also want to reload an image if the original file contains new content.
To unload and reload an image
Do one of the following to choose Image Manager:
- On the ribbon, choose Insert > Image Manager (in Data).
- On the menu, choose Insert > Image > Image Manager.
- On the Image toolbar, click the Image Manager tool.
- Type image and then press Enter.
In the Images list, select the desired image. If there is more than one occurrence of the image in the drawing, do one of the following:
- To unload or reload all occurrences of the image, select a top-level image in the list.
- To unload or reload a single occurrence of the image, expand a top-level image in the list, and then select the individual image.
Do one of the following:
- To unload the image so only its outer edge displays, click Unload.
- To reload the image so its contents display and print, click Reload.
Changing the path for images
If the file associated with an image is renamed or moved to a different location, the program displays a message indicating that it cannot load the image. You can re-establish the link to the file by changing the path for the image.
To change the path for an image
Do one of the following to choose Image Manager:
- On the ribbon, choose Insert > Image Manager (in Data).
- On the menu, choose Insert > Image > Image Manager.
- On the Image toolbar, click the Image Manager tool.
- Type image and then press Enter.
In the Images list, select the desired image. If there is more than one occurrence of the image in the drawing, do one of the following:
- To change the path for all occurrences of the image, select a top-level image in the list.
- To change the path for a single occurrence of the image, expand a top-level image in the list, and then select the individual image.
Click the [...] button.
Select the file with its new name or in its new location, and then click Open.
Click Set Path.
Deleting images
Once an image is no longer required in the drawing, you can delete it from the drawing. Deleting an image removes it from the drawing, and from the list of images in the Image Manager dialog box.
To delete an image
Do one of the following to choose Image Manager:
- On the ribbon, choose Insert > Image Manager (in Data).
- On the menu, choose Insert > Image > Image Manager.
- On the Image toolbar, click the Image Manager tool.
- Type image and then press Enter.
In the Images list, select the image you want to delete. If there is more than one occurrence of the image in the drawing, do one of the following:
- To delete all occurrences of the image, select a top-level image in the list.
- To delete a single occurrence of the image, expand a top-level image in the list, and then select the individual image.
Click Detach.
© Copyright 2021 BackToCAD Technolgies LLC . All rights reserved. Kazmierczak® is a registered trademark of Kazmierczak Software GmbH. CADdirect 2022 is a trademark of Expert Robotics Inc. Print2CAD and CAD2Print are Trademarks of BackToCAD Technologies LLC. DWG is the name of Autodesk’s proprietary file format and technology used in AutoCAD® software and related products. Autodesk, the Autodesk logo, AutoCAD, DWG are registered trademarks or trademarks of Autodesk, Inc., and/or its subsidiaries and/or affiliates in the USA and/or other countries. All other brand names, product names, or trademarks belong to their respective holders. This website is independent of Autodesk, Inc., and is not authorized by, endorsed by, sponsored by, affiliated with, or otherwise approved by Autodesk, Inc. The material and software have been placed on this Internet site under the authority of the copyright owner for the sole purpose of viewing of the materials by users of this site. Users, press, or journalists are not authorized to reproduce any of the materials in any form or by any means, electronic or mechanical, including data storage and retrieval systems, recording, printing or photocopying.